New September 2007
Jigs for Shaping Furniture
Go to Main Menu
Return to Tools Index
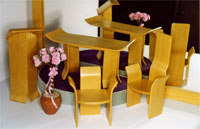
| Numerous jigs were required to construct this set of modern Church furniture and it resulted in one of my favourite items. |  |
The technique of forming shaped parts has been used on several items of dolls house furniture I have made and, because it is not commonly seen, makes for unusual pieces of furniture. It is not a difficult process, but it does require three thin strips of timber to be glued and clamped together in a jig. |
| This is the set of jigs used. Since side parts are used on the normal and high back chairs. the pews and the table legs, five sets of chair side jigs were manufactured enabling numerous side pieces to be made at a time. | 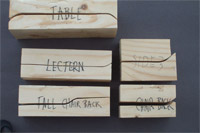 |
| 1) The jig is made from timber of a suitable thickness that is the same length
and width as the part to be made. |
|
| 2) Attach the shape pattern to the side and saw the jig to shape. It may be possible to use a hand fretsaw but a scroll saw will make it much easier. Use a coarse blade in the saw to make the sawing easier and effectively allow for the thickness of the part to be made. |
| 1) Cut lengths of 0.8mm (1/32") thick timber from the correct width strips slightly longer than the jig. Three lengths are generally used but more can be used if required. Soak these in boiling hot water for a few minutes to make them supple. | |
| 2) In preparation for gluing these veneers together, pour a small amount of glue into an old saucer. | |
| 3) Remove the strips from the water with a pair of tongs and dry them of excess water on a towel. | |
| 4) Leaving a 1.5mm (1/16") along the sides clear of glue, use a small paint brush to spread glue over the top face of one strip. Place this, glue face upwards on the jig base with sides flush and both ends overhanging the jig. | |
| 5) Similarly, spread glue over both sides of the second strip and drop this onto the first strip. | |
| 6) Spread glue over the lower face of the third strip and place this on the pile. | |
| 7) Check that the edges of the strips are flush with the side of the jig. | |
| 8) Holding them in this position, drop the jig top in place checking that the jig ends are correctly aligned. | |
| 9) Push down firmly on the curved section of the jig. |
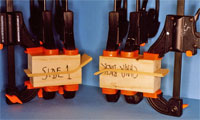 |
1) Clamp the assembly together with three or four clamps, applying sufficient pressure
to force the jigs to fully close. 2) Leave the assembly in a warm place, an airing cupboard is ideal, for at least 24 hours to allow the glue to dry and the water to evaporate. |
| 1) Before disassembly, draw lines on the top surface of the part along the ends of the jig to indicate the points at which the part is to be cut to size. |
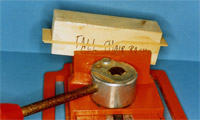
| 2) Remove the clamps. 3) If some glue oozed beyond the edges when fitting the clamps, the excess may have seeped into the jig itself making it difficult to separate the pieces. First, try pulling the parts hard to break the seal but if it is too tight, place the bottom of the jig in a vice and hit the side of the jig gently with a hammer. Take care with your aim since hitting the jig along the mould line may cause damage. |
 |
| 1) Saw along the marked lines to cut the part to size. A razor saw is the ideal tool to use for this step. | |
| 2) Sand all faces of the part, shaping the ends as required. | |
| 3) The sanding should have removed all traces of surface glue and the part may be stained if required to complete the fabrication process. |
Go to top of Page
© 2007 Neil Helsby